A Complete Deep Dive on Solana's New Transactional Architecture - How Address Lookup Tables and V0 transactions work.
An overview on how to create an address lookup table and how to test variant transactions with Phantom Code SandBox


When processing transactions on the Solana network, through the Solana runtime, transactions are carried out in parallel execution format before blocks are added to the network.
Due to data packet sizes, these Maximum transactional units(MTUs) has limited capacity to the number of programs/address stored in a preferred state before transactions can be validated.
As a problem of the Solana network, address lookup tables and V0 transactions is implemented to increase the number of address to be stored yet maintain the size of data packets for transactional recording.
In this article, you'll have an overview of address lookup tables(ALTs/LUTs), their relation with V0 transactional messages and different means of how address lookup tables work using Phantom CodeSandBox.
Address Lookup Tables (LUT)
Address Lookup tables are tables built with an array-like structure where a table acts as an individual address wrapper to hold addresses on-chain.
With this structure, a table has its specific address which can be used for reference in a transactional message and these addresses are appended to the table and can be located with a 1-byte u8 index rather than a 36-byte u8 index.
Typically, before transactions are carried out addresses are stored in the transactional message which leads to consuming the space of data packets for transactional execution.
With account-lookup tables, a table can contain several addresses and when an address is stored on-chain, it can be referenced through its u8 index. Hence, each address has its unique u8 index,
Compared to the legacy account lookup where each address is added to the transaction message and consumes more space and yet little amount of address stored.
Represented by the image below:
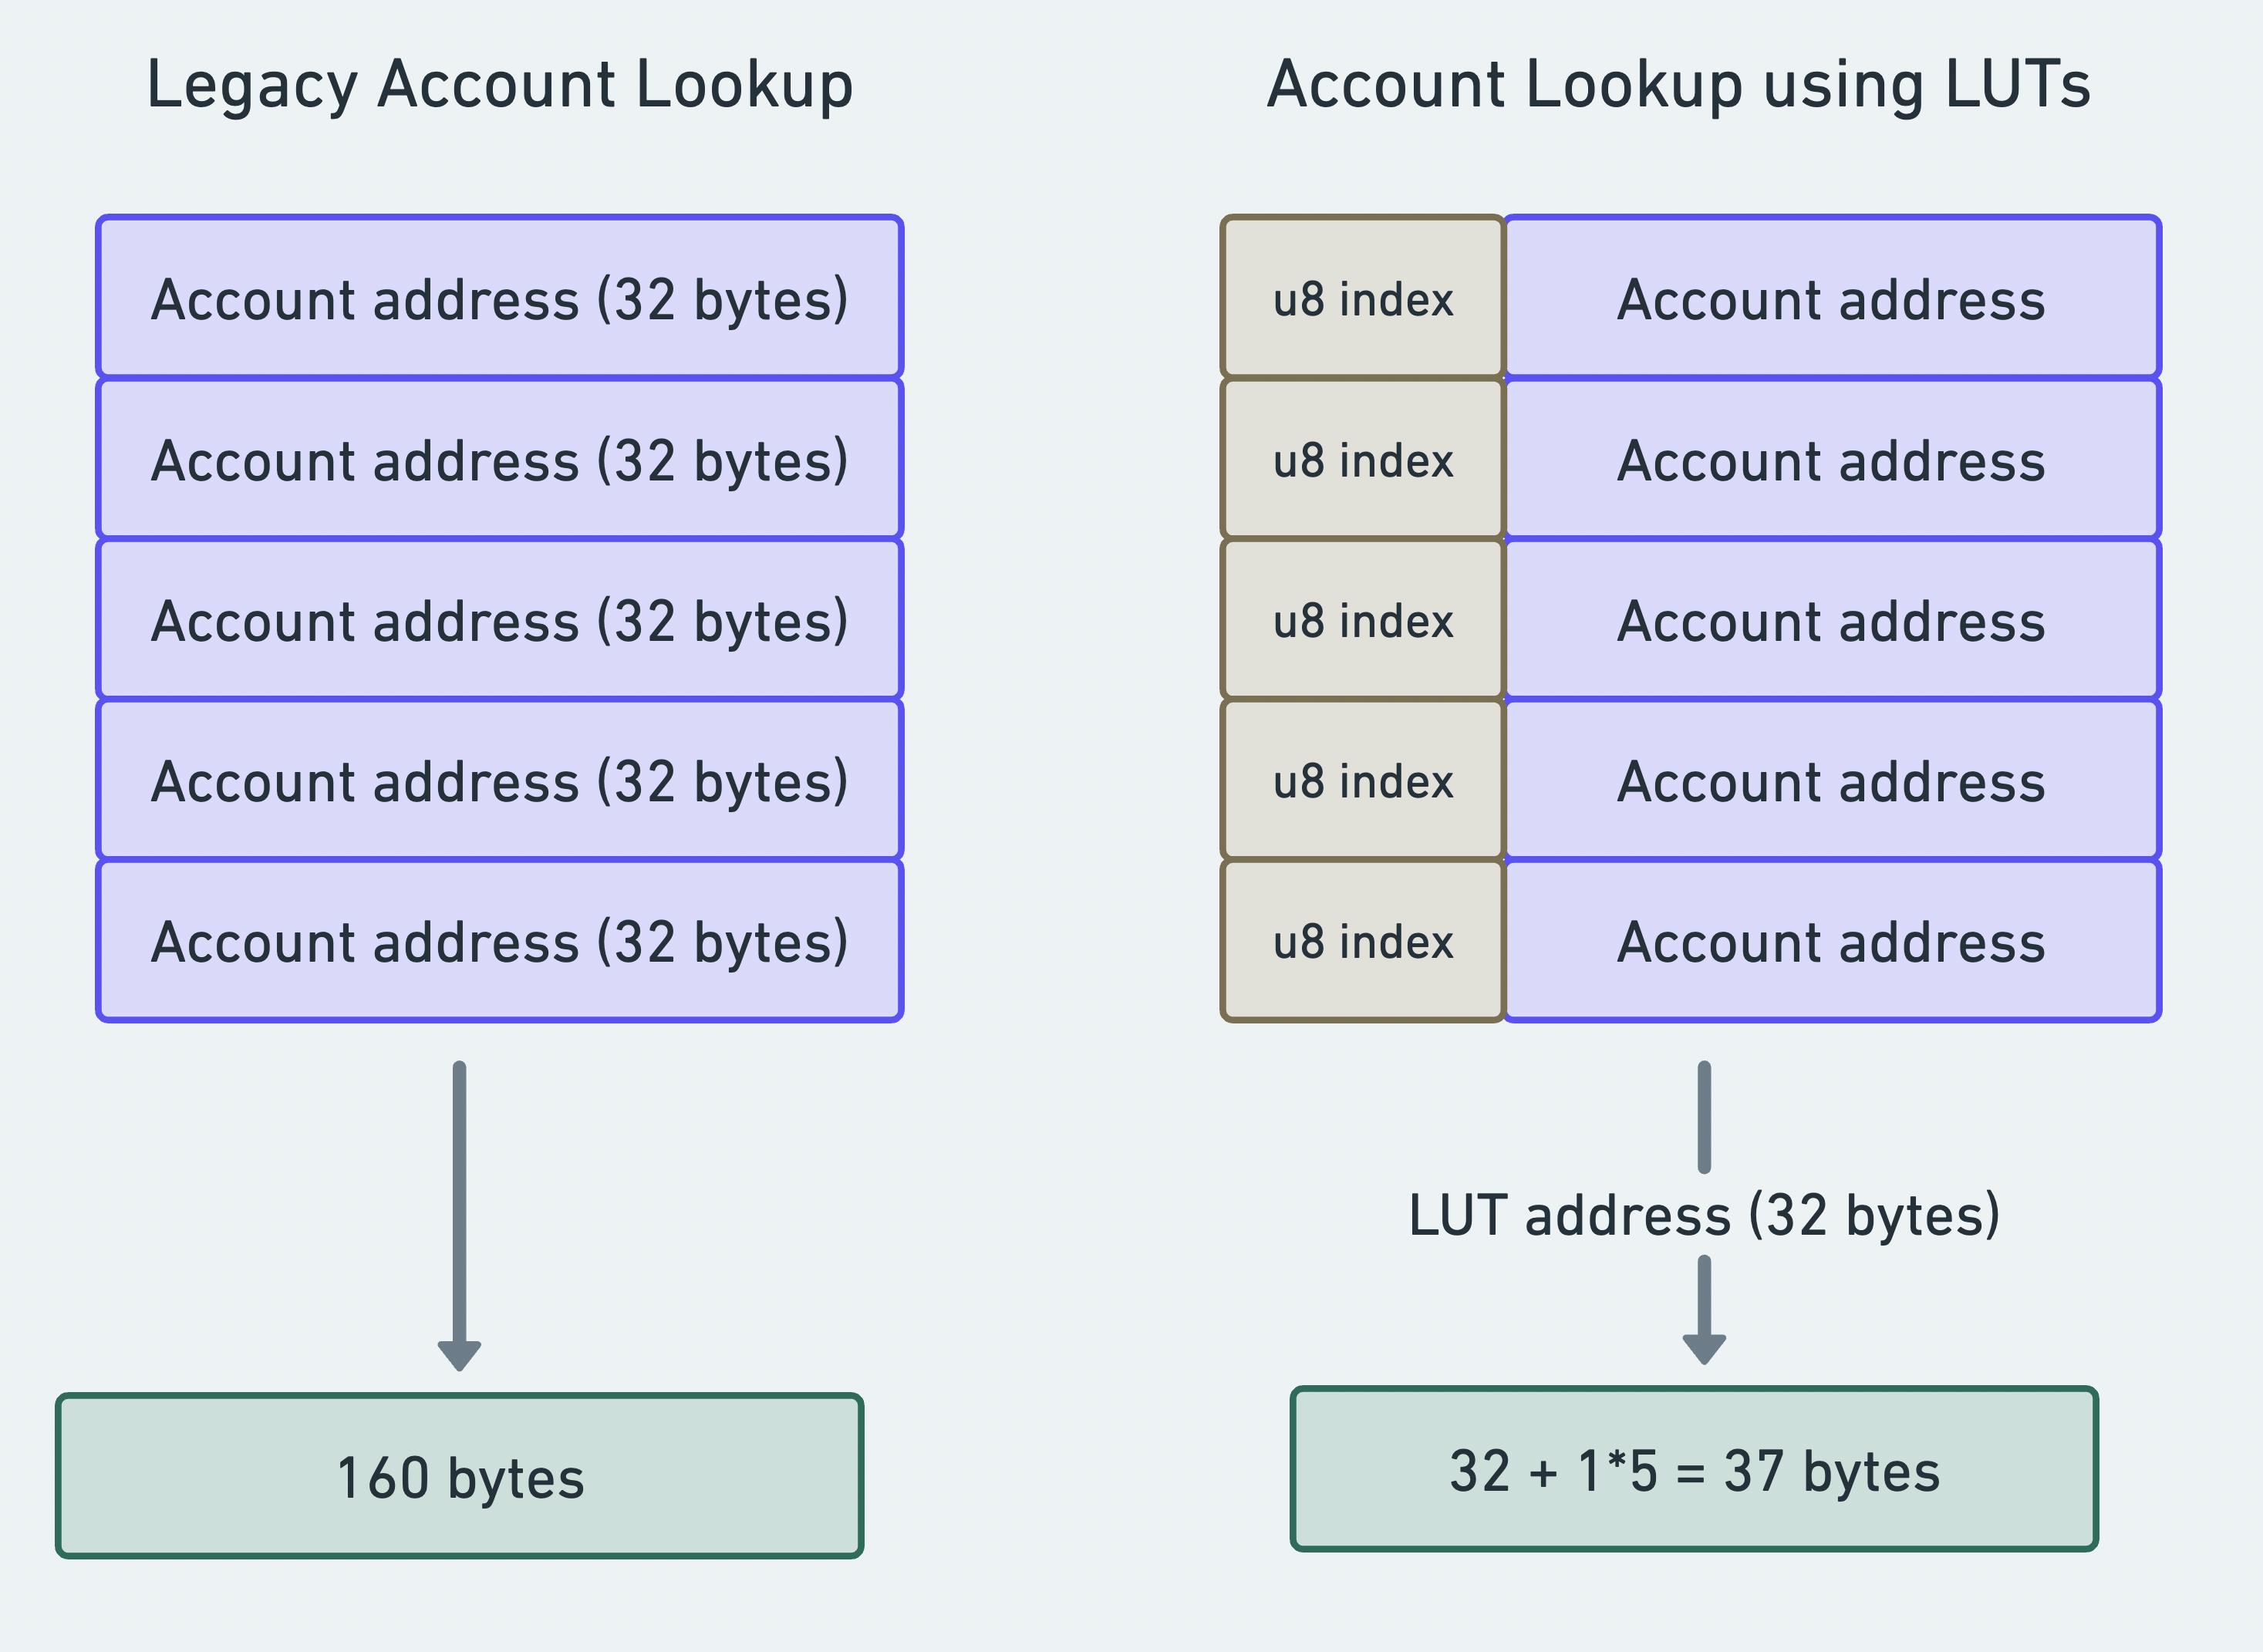
With legacy transactions, account addresses occupy 32 bytes in a transaction message. Whereas while using an LUT, each table address occupies 32 bytes with account addresses added to the table to save space.
A typical legacy transaction comprises two parts that merge up to fill up the maximum transaction unit which is limited to 1232 bytes.
These two parts of a legacy transaction include:
Signatures; this comprises a header, compact address, blockhash and an array of instructions;
Messages that comprise metadata and account address.
In as much as account lookup tables have both sides in a transaction message, with its referencing format, this leads to the possibility of storing over 256 accounts (2^8) in a specific lookup table and this can be done in two ways;
On-chain buffering and;
Manual appending through the use of
.extensioninstruction.
How to Reference a Specific Transaction Type
pub enum VersionedMessage {
    Legacy(Message),
    V0(v0::Message),
}
These are two different transaction format and the address lookup table only interact with messages v0 hence The VersionedMessage enum, in the context of a backend, could be used to handle different versions of messages or commands.
The backend might receive messages from various sources, and using this enum allows it to process messages differently based on their version.
If the backend receives a VersionedMessage::V0(v0::Message), this can apply a specific logic for the V0 version.
This approach provides a way to maintain backward compatibility or introduce changes by accommodating different message structures or versions in the backend's processing logic.
How to Create Account Lookup Tables
Prerequisites
To have a full grasp of how an account lookup table can be created you must have the following in place:
A complete Solana working environment with command line tools (CLI).
A Solana-compatible wallet (most preferably phantom) to carry out transactions.
Basic experience in Solana development using Rust, Typescript and Node.js
Step 1: Initialize your Solana CLI environment
use solana_sdk::{
    pubkey::Pubkey,
    signature::{Keypair, Signer},
    transaction::Transaction,
    connection::RpcClient,
    system_instruction,
};

// Connect to the Solana cluster
let rpc_client = RpcClient::new("https://devnet.solana.com".to_string());

// Assumption: 'payer' is a valid Keypair with enough SOL to pay for the execution
let payer = Keypair::new();

// Fetch the current slot
let slot = rpc_client.get_slot().unwrap();

println!("Initialized Solana CLI environment");
During the initialization of the Solana CLI, this connects to the Devnet, hence generating a random key pair for a payer made by the function let payer = Keypair::new(), this fetches the current blockchain slot, and prints an initialization message.
Step 2: How to create an Address Look-Up Table (LUT)
use solana_sdk::transaction::Transaction;

// Create an Address Look-Up Table
let create_lut_instruction = solana_address_lookup_table_program::instruction::create_lookup_table(
    &payer.pubkey(),
    &payer.pubkey(),
    slot,
);

// Construct a transaction
let transaction = Transaction::new_signed(
    &[payer.as_ref()],
    Some(&payer.pubkey()),
    vec![create_lut_instruction],
    rpc_client.get_recent_blockhash().unwrap().0,
);

// Sign and send the transaction
rpc_client.send_and_confirm_transaction(&transaction).unwrap();

let lookup_table_address = solana_address_lookup_table_program::find_lookup_table_address(
    &payer.pubkey(),
    slot,
);

println!("Lookup table address: {:?}", lookup_table_address);
Here, the address lookup account is initialized by the second code line where the instruction:create_lookup_table is given then a signing takes place signs by using the payer's key pair, sending and confirming the transaction on the Solana cluster, and printing the resulting look-up table address.
Step 3: How to Add Addresses to the Look-Up Table
use solana_sdk::transaction::Transaction;

// Define addresses to add to the lookup table
let addresses_to_add = vec![
    payer.pubkey(),
    solana_sdk::system_program::id(), // Example address, add more if needed
];

// Add addresses to the lookup table using the 'extend' instruction
let extend_instruction = solana_address_lookup_table_program::instruction::extend_lookup_table(
    &payer.pubkey(),
    &payer.pubkey(),
    &lookup_table_address,
    addresses_to_add,
);

// Construct a transaction
let transaction = Transaction::new_signed(
    &[payer.as_ref()],
    Some(&payer.pubkey()),
    vec![extend_instruction],
    rpc_client.get_recent_blockhash().unwrap().0,
);

// Sign and send the transaction
rpc_client.send_and_confirm_transaction(&transaction).unwrap();

println!("Addresses added to the lookup table");
To add an address to the lookup table, each address would be added by appending more public keys to the second line of the code and extend_lookup_table instruction will then include all the addresses in the vector when executed.
Step 4: How to Fetch an Address from the Look-Up Table
// Fetch the table from the cluster
let lookup_table_account = rpc_client
    .get_account_with_commitment(&lookup_table_address, rpc_client.commitment())
    .unwrap()
    .value;

// 'lookup_table_account' will now be an 'Account' object
println!("Table address from cluster: {:?}", lookup_table_account.owner);
Here, the Address Look-Up Table account is gotten from the Solana cluster using the provided lookup_table_address. It ensures the commitment level using rpc_client.commitment(), unwraps the result and extracts the value, which is an Account object.
Finally, it prints the owner's public key of the retrieved account to the console.
With the Phantom Code SandBox, you can try sending and signing transactions on the Legacy account format, V0 transaction format and V0+Lookup transaction format to check out the specific details on the fields they contain.
How to test legacy and V0 transactions using Phantom Sand Codebox
Click on the link, https://codesandbox.io/s/github/phantom-labs/sandbox and set up your account.
After setting up an account, hover your mouse at the third vertical section of your desktop where you find Connect phantom
As indicated in the image, click on it to open a new window. Once in a new window, you can test out the transactions.
To test out the transactions, click on each button and watch the display as it runs down a list of programs and authentication.
Sending and signing transactions on Legacy
Here's the output you get after clicking the button and signing a transaction.
> info
[signAndSendTransaction]

Requesting signature for: {"recentBlockhash":"G1HELAM2LY27QyCF9T6U3qrnUgxN4LjFFEzYJ1ZjgDXs","feePayer":"A2n2nSdEzijZ1WzuyGXo63s5sERwcmhApEM2TPbrgmB5","nonceInfo":null,"instructions":[{"keys":[{"pubkey":"A2n2nSdEzijZ1WzuyGXo63s5sERwcmhApEM2TPbrgmB5","isSigner":true,"isWritable":true},{"pubkey":"A2n2nSdEzijZ1WzuyGXo63s5sERwcmhApEM2TPbrgmB5","isSigner":false,"isWritable":true}],"programId":"11111111111111111111111111111111","data":[2,0,0,0,100,0,0,0,0,0,0,0]}],"signers":[]}

> info
[signAndSendTransaction]

Signed and submitted transaction 46G6HpXbZeS4MTFCMsv2mMSyrMts3mt9RVtEbbZXMtMsrPGR5EMymqcrCEHbMpn3oSnmTphdL9d7rjt1zBU6Zu3U.

> success
[signAndSendTransaction]

Transaction: 46G6HpXbZeS4MTFCMsv2mMSyrMts3mt9RVtEbbZXMtMsrPGR5EMymqcrCEHbMpn3oSnmTphdL9d7rjt1zBU6Zu3U

Status: Confirmed
When sending and signing transactions on Legacy, certain key fields like recentBlockhash is formed, and fee payer and other data-related fields are written in the transactional program before a transaction can be confirmed and the transaction ID is gotten.
Sending and signing transactions with V0
> info
[signAndSendTransactionV0]

Requesting signature for: {"signatures":[{"0":0,"1":0,"2":0,"3":0,"4":0,"5":0,"6":0,"7":0,"8":0,"9":0,"10":0,"11":0,"12":0,"13":0,"14":0,"15":0,"16":0,"17":0,"18":0,"19":0,"20":0,"21":0,"22":0,"23":0,"24":0,"25":0,"26":0,"27":0,"28":0,"29":0,"30":0,"31":0,"32":0,"33":0,"34":0,"35":0,"36":0,"37":0,"38":0,"39":0,"40":0,"41":0,"42":0,"43":0,"44":0,"45":0,"46":0,"47":0,"48":0,"49":0,"50":0,"51":0,"52":0,"53":0,"54":0,"55":0,"56":0,"57":0,"58":0,"59":0,"60":0,"61":0,"62":0,"63":0}],"message":{"header":{"numRequiredSignatures":1,"numReadonlySignedAccounts":0,"numReadonlyUnsignedAccounts":1},"staticAccountKeys":["A2n2nSdEzijZ1WzuyGXo63s5sERwcmhApEM2TPbrgmB5","11111111111111111111111111111111"],"recentBlockhash":"BJ7v1Gf8YPFpRVMJ2Z1iAbqD3BzrVqbq6CzUxUoQkTCd","compiledInstructions":[{"programIdIndex":1,"accountKeyIndexes":[0,0],"data":{"type":"Buffer","data":[2,0,0,0,0,152,13,0,0,0,0,0]}}],"addressTableLookups":[]}}

> info
[signAndSendTransactionV0]

Signed and submitted transactionV0 5EKeyBnr4uxB2PBubwJvDFWSnZnqigMJLuCf2J9gkpiLLWUzMhEFyoxtdihAwCinUSrehX1pWH4xd2RTme7Xs1L5.

> success
[signAndSendTransaction]

Transaction: 5EKeyBnr4uxB2PBubwJvDFWSnZnqigMJLuCf2J9gkpiLLWUzMhEFyoxtdihAwCinUSrehX1pWH4xd2RTme7Xs1L5

Status: Confirmed

> success
[signAndSendTransaction]

Transaction: 5EKeyBnr4uxB2PBubwJvDFWSnZnqigMJLuCf2J9gkpiLLWUzMhEFyoxtdihAwCinUSrehX1pWH4xd2RTme7Xs1L5

Status: Confirmed
When sending and signing transactions with the V0 button, new fields are generated in the process: numRequiredSignatures, numReadonlySignedAccounts, numReadonlyUnsignedAccounts and the addressTableLookups function alongside other functions generated before a transaction can be submitted in Legacy.
numRequiredsignatures, numReadonlysignedaccounts, numReadonlyUnsignedaccounts shows the specification in the codebase given after these specific functions are programmed.
Signing and sending transactions with V0+lookup tables
info
[signAndSendTransactionV0WithLookupTable]

Signed and submitted transactionV0 to make an Address Lookup Table Bk2v1dj8PNyVCm14Ha8CG74R7uDNQWKnTcYj8Rpa9MU6 with signature: 4q224RU1k7qW74ags3Yx78SwayKLmxAgYVnnuTTgLbegVbS5uWUSVjm58Xqcqg6iaYXQZPv8hfDQMx8btN3cA131. Please wait for 5-7 seconds after signing the next transaction to be able to see the next transaction popup. This time is needed as newly appended addresses require one slot to warmup before being available to transactions for lookups.

> info
[signAndSendTransactionV0WithLookupTable]

Signed and submitted transactionV0 to extend Address Lookup Table 5CCdEekkakskSbzwTeth4vQKWfiBcnQukUenDczbwYxPRp9w4CRq3BcQwrABBewXhWHhbL2au7r1tJ3TnxAgUbSE.

> info
[signAndSendTransactionV0WithLookupTable]

Signed and submitted transactionV0 with Address Lookup Table 5hCRFM36g436vgCzJFkvsGtchcCk1PEqX48XPGmav8tDGen2K6jVcCLoekRk7uDrnoDGYXXr2mW42LPV2gXzL6tz.

> success
[signAndSendTransaction]

Transaction: 5hCRFM36g436vgCzJFkvsGtchcCk1PEqX48XPGmav8tDGen2K6jVcCLoekRk7uDrnoDGYXXr2mW42LPV2gXzL6tz

Status: Confirmed
Meanwhile, this is different for the sending and signing of transactions with V0+lookup tables.
During this phase after writing programs, 3 rounds of signing of transactions are required before a transaction ID can be created.
As indicated in the code snippet above the following process includes:
First signing process: This is a signature required to create a lookup table and here the address to the lookup table is:
Bk2v1dj8PNyVCm14Ha8CG74R7uDNQWKnTcYj8Rpa9MU6Second signing process: This is a signature required to extend the account lookup table. This can be manually written as:
.extendLookTable
Other functions are:.closeLookupTable,.createLookupTableand.freezeLookupTableThird signing process: This is a signature required to generate the transaction ID for the Lookup table for referencing to append individual addresses manually.
After creating your account lookup table, the Byob bot is a good tool for managing your LUT on Solscan.io.
Here's the destination of my account Lookup table on Solscan: https://solscan.io/account/Bk2v1dj8PNyVCm14Ha8CG74R7uDNQWKnTcYj8Rpa9MU6
However, here's a link to check out the full Phantom Sandbox codebase on Github:
Other resources include:
https://docs.phantom.app/
https://codesandbox.io/s/github/phantom-labs/sandbox?file=/src/App.tsx
https://youtu.be/baxpr_EcRCo?si=tToLTkqjhqxY1Xf1